This is what we shall be making:
For this project you will need:
- Buttons in various sizes (you can find a selection on our website here)
- Wire (ideally 0.6mm+ we have jewellery wire here, when I originally made these I used garden wire)
- Pipe Cleaners
- Pipe Cleaners
- Double Sided Patterned Paper - 1 12x12 sheet will make 3 flowers (You can see our Paper here, I used the Echo Park Dots and Stripes Candy Shoppe for my flowers)
- Wire Cutters & scissors
- Glue (I used Glossy Accents)
- Mica Mists (you can see our range of colours available here)
- Glitter Glue (I used Diamond Stickles)
Making the Button Flowers
Step 1: Make up piles of buttons going from biggest to smallest (5 or 6 buttons works best for these flowers)
Step 2: Cut your wire to double the length that you want your finished flowers to be. Mine measured 18". And fold in half.
Step 3: Start to thread your buttons onto the wire starting with the smallest first.
Step 4: Twist the wire close to the bottom button a few times so that they stay in place.
Step 5: Repeat for however many you want to make. I made 16 for my bouquet.
Making the Paper Roses
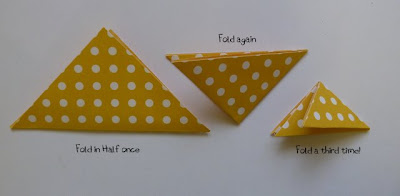
Step 1: Cut 3 4"x4" squares of paper. Fold each square in half on the diagonal 3 times (to create a small triangle)
Step 2: Cut each triangle into a petal shape and snip off the point.
Step 3: Unfold and you will have 3 - 8 petal flowers with a hole in the middle.
Step 4: Ink the edges of your flowers if you desire.
Step 5: Cut the flowers as follows:
Cut 1 flower in half, cut 3 petals off the second and cut 2 petals off the third.
Step 6: Now you need to start gluing your flowers. Apply glue to 1 of the end petals on the 6 petal, 5 petal, 1 of the 4 petal pieces and the 3 petal piece. Fold the other end petal over the glued one and hold until it sticks!
You will end up with the following:
Step 7: Now take your 2 petal piece and curl the ends back. I used the end of a paint brush.
Step 8: Curl the petals around the paintbrush (or your choice of pointy stick!) and glue in place. Make sure you leave a big enough hole in the middle so that you can fit the smaller single petal inside it.
Step 9: Take the half flower that you have left and cut 1 petal off. Now curl the end back and around your pointy stick as above. You will now have the following:
Step 10: Curl the petals back on each of the flowers.
Step 11: Now you can start to stack your flower. Start with the 2nd largest petal piece and apply glue to the bottom around the hole. Then place into the larger flower and hold until it has stuck!
Repeat the gluing until you only have the 2 smallest pieces left. Apply glue to the smallest piece and push into the other piece. Before you apply glue to that piece check to see if you need to trim it down by placing into the centre of your flower. If it sticks out the top too much just trim a bit off the end.
Now your flower is complete!
Step 12: Now you want to make your flowers shimmer and sparkle! I used a Mica mist to spray each of my flowers (let them dry) then added some stickles or other glitter glue. Apply to each petal and then spread with a paintbrush or your finger!
Step 13: Now you need to add your pipe cleaners to the flowers. I started off with 12" ones and trimmed them down to 9" to match my button flowers. Make sure the hole in the bottom of your flower is big enough (you may need to trim it slightly) and thread your pipe cleaner into it. You can simple leave like that or apply some glue to the top of the pipe cleaner to hold it in place.
Step 14: Now arrange your flowers and buttons in your vase and you have a beautiful arrangement that won't die and that you can make to match your decor!
I hope you have enjoyed this tutorial and I would absolutely love to see if you create any bouquets yourself, feel free to leave a comment here or join us on Facebook.
For now, Happy Crafting ~ Maxine
Instructions © Maxine for Creative Hobby Supplies, Please do not reproduce without prior permission. 2013


No comments:
Post a Comment